Monday, October 19, 2015

Painting Pumpkins

Here's a great seasonally inspired, minimal set up activity. You can even start this with a trip to the pumpkin patch! 

These little pumpkins were 3/$2 so we picked up a few. I knew they would be the perfect size for Monkey to do some activities with. 

This activity is painting the pumpkins. Simple really, but it's always new and interesting to paint on a different surface than paper, and in this case, three dimensional. 

Supplies: paint, paintbrushes, pumpkins


Monkey is all about helping. He wants to do everything by himself and help with any job he can. Today he wanted to help squeeze the paint into our paint tray. I am trying to let him help if he wants to instead of saying no all the time. So I reminded myself that it's just paint and it can be cleaned up and I let him help. 


He was so proud and didn't make a mess at all - which I shouldn't be surprised about because he generally does like being neat and clean like his mommy. 


Once we had everything organized, we got painting! I wasn't planning on painting but Monkey chose a pumpkin for me, how could I say no?


I think they turned out great!


Mar

Wednesday, October 14, 2015

Markers on a Mirror

Just like yesterday, here's an activity with virtually zero set up. I love that because it means less work and even if Monkey only plays for a few minutes it's still worth the effort. 

Mirrors are a fun medium for kids to work with. They allow for a neat 3D sort of effect with the reflection. It adds another dimension to what you're doing. And I find that most kids like to look at themselves, too!

Supplies: dry erase markers, eraser, mirror


I have a large mirror (from school) but this would work just as well with a smaller mirror. 

Monkey was a little hesitant to get started. It is certainly a little different and I do usually reinforce that he only draws on paper or his easel. But once I took the lid off a marker and gave it to him, he was hooked. 


He mostly did a lot of scribbling. I'm trying to encourage him to start drawing pictures of objects or people but he just wants me to draw them for him, which means he's probably not ready yet. 

He did practice writing his name - he can do the first letter by himself now, yay!! - but I won't show that. 

If he made a mistake or wanted to try something new, he just used the eraser. 


I find that the eraser takes away all the colour but it does leave behind a bit of  residue. Glass cleaner usually does the trick with that (or nail polish remover is really good too, especially on surfaces other than glass or dry erase boards). 

Mar

Tuesday, October 13, 2015

Fine Motor Building

Today's activity is one that requires no set up. I threw the supplies together in a bin and let Monkey loose with it.

Lately he's been playing really well on his own. He can go for a long time without needing me - which is good for sooo many reasons but also a sign that he is growing up too fast! So, I give him space but I sit down with him for a few minutes here and there to talk and give him a chance to tell me what he's doing, and maybe work through any problems he's having. 

In my Kindergarten classroom I've really embraced the idea of loose parts. I know it's something that teachers have been doing forever - spare buttons, popsicle sticks, corks, stones, etc - but now there is a ton of literature that really supports loose parts being a daily part of the classroom. Since there is no prescribed way to play with these objects, it's really up to the kids to use their imagination and creativity. 

The dollar store is a great place to start if you're looking to make a collection of loose parts. That's where I found the materials we used today. Personally, I like my loose parts to be made from natural materials, but if I come across something really great I make an exception. 

Supplies: colored popsicle sticks, colored wooden blocks 


In my classroom I only have the plain wood sticks and blocks but I thought Monkey might like these better. 

Monkey immediately started stacking up the blocks. Blocks are something he is familiar with so this didn't surprise me. 


It's harder when the blocks are the same size as his finger tips. But he started to get the idea. 


I sat down with him for a few minutes and encouraged him to continue with the combination of blocks and sticks that he had built in front of his knee in the photo above. 

Here's what we came up with together. 


As we built I used vocabulary like sturdy and stable. Also, I love him so much when he wants to colour coordinate things. He gets that from me :)

After we built the tower he wanted to make a race track for his cars. (Big surprise - oh wait, no.) So I told him to go  grab one of his Lightning McQueen books so he could look at the race track and build it. 

With some help, this is what he made. 


And he added some of his cars for a race. 


This part of the activity kept him entertained the longest. He moved his cars one by one around the track in their race over and over again. 


We've pulled out the popsicle sticks a few more times already to build his race track, which he can now do by himself. 

Mar

Friday, October 02, 2015

Cereal Name

Monkey knows his alphabet. We've been doing a lot of alphabet activities, books, videos, and puzzles over the past year. I want to start working on spelling and writing his name. 

I have seen this idea many times. I was reminded of it by one of the teachers I follow on Instagram, thekinderteacher. 

This is an activity that comes together fast because you likely have everything you need already and there is very little set up. 

Supplies: construction paper, glue, marker, cereal


This is a tricky activity for me to really share properly because I won't use or show Monkey's name. But I think you'll get the idea even if you don't get to see the end product. 

First, I wrote his name on the paper with the marker. I asked him to tell me the letters which he did with some prompting and clues from me. 

Monkey loves using the white glue so I thought he would want to go over the letters himself. For some reason he was being a bit nervous about it, so we squeezed the glue onto the first letter together. 

Then he started carefully putting on the cereal. As I suspected he wanted to eat it too :)


We did one letter at a time, glue then cereal, just to avoid making a sticky mess if we could. 


It turned out really cute and Monkey had a lot of fun, although that might have been the fact that he got to eat, too...

Mar

Thursday, October 01, 2015

Thanksgiving Handprint Cards

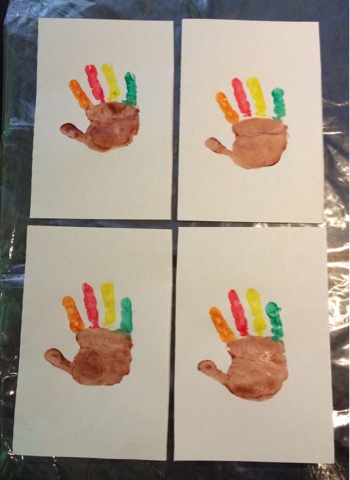
Today we made cute little handprint turkeys to send to some family and friends. You can never go wrong with a handprint, everybody loves them!


Supplies: paint, paintbrushes, paper or cardstock, markers, googly eyes, glue


We decided to make ten cards. I cut our white paper in half so it would go a bit farther - Monkey's hand is still small enough to fit on half, thank goodness!!


After getting set up, I started by painting Monkey's hand. I did the palm and thumb in brown for the body, neck, and head of the turkey. The four fingers were orange, yellow, brown, and green, because apparently that's what colour turkey feathers are?!? It looks cute and they're fall colours so I'm standing by it!


I will never get old of the way he giggles and says, "That tickles, that tickles!" when I'm painting his hand. 

Next we stamped it onto the page, trying to stay in the middle as much as possible. 


After repeating this ten times (a bit of an assembly line) we laid them out to dry. 


Later on in the afternoon when the paint was dry, we added the googly eyes and other details of the turkey with markers.

I wrote 'Happy Thanksgiving' and signed Monkey's name at the bottom. 


I know a few people who will get a special surprise in the mail next week!

Mar